
Default Configuration Download (8/18/26)
Overview
This guide covers the Stream Deck configuration used to control eMotimo motion control devices through Bitfocus Companion.
The provided Companion configuration is designed as a starting point for operating one or more eMotimo devices from a Stream Deck. It organizes commonly used controls into dedicated pages, making it easy to move motors, establish working limits, create and recall presets, adjust motion timing and speed, build repeating moves, and access additional device functions.
The configuration includes pages for:
- Multi-device control – Quickly access multiple eMotimo devices and trigger combined presets or emergency stops from a single page.
- Live motor control – Jog individual axes to frame shots, test motor direction and speed, and verify the available working range.
- Limits – Set, recall, and clear motor limits to define a safe operating area.
- Presets – Save motor positions and recall them later with independently adjustable run and ramp times.
- Looping moves – Create continuous moves between two saved positions with configurable timing.
- Axis speeds – Adjust the maximum live-control speed for individual motors.
- Virtual navigation – Control the eMotimo menu system directly from the Stream Deck.
- Stream Deck+ controls – Use the additional encoders and touchscreen functions available on the Stream Deck+, including position-based control of supported Tilta motors.
These layouts are examples rather than a required way to operate your system. Companion pages and buttons can be rearranged, duplicated, or customized to match your specific camera setup and production workflow.
The following sections walk through the supplied pages and explain what each group of controls is designed to do.
Pages
Page 1 (Dual Live Control)
This screen demonstrates having quick access to controls for two eMotimo devices. The Left set of Arrows control the Pan/Tilt of device 1 and the right set controls Pan/Tilt of device 2. The row of Combined Preset buttons at the bottom of the screen show how you can recall a preset on multiple devices. This can easily be extended to support more than two devices. The E-Stop also demonstrates that you can setup an emergency stop button for multiple devices on a single button. The eMotimo 1/2 buttons show how you can set a page navigation to a specific page, this lets you separate the Device 1 which are on pages (2-9) and the device 2 which are on pages (11-18). Finally, there is some buttons in the center column for calibrating Tilta motors or re-centering a DJI Gimbal.
Page 2 & 10 (Motor Control)
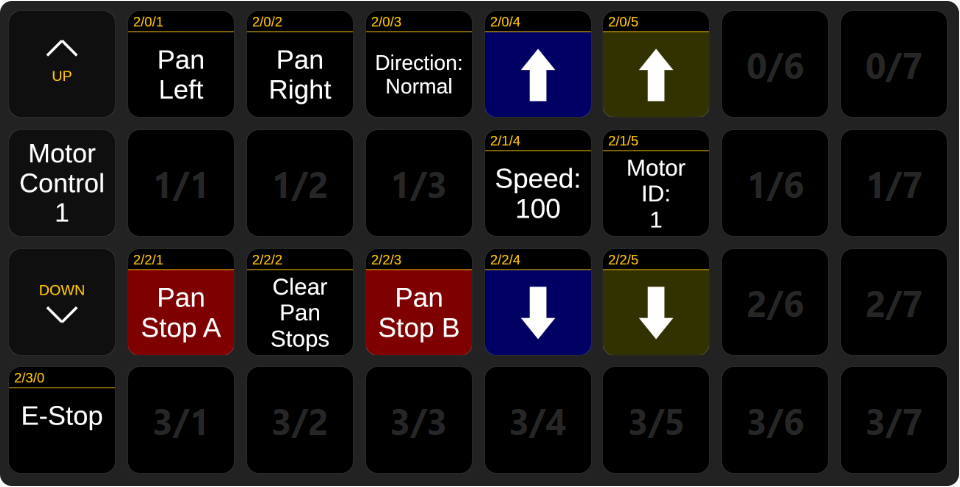
This screen is an example of how you could organize your motors by axis on a single page so you can test your motor speed. Set the Stops and use the live control to test both the speed and working range during your initial setup.
Page 3 & 11 (Presets)
This screen is a smarter preset authoring screen that gives you more space by using a current ID to let you setup up to 30 presets and set the unique timing for each preset.
Page 4 & 12 (Loops)
This screen lets you author loops that when active will move between the Loop A point and B point which is using the ID of two preset positions. The looping mode has symmetrical timing moving in both directions which is determined by the Loop Run time and Ramp Time.
Page 5 & 13 (Axis Control)
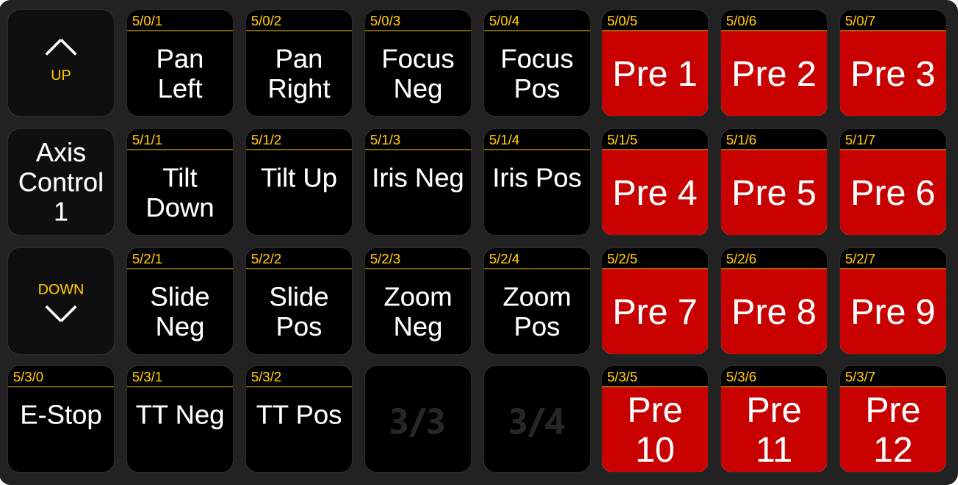
This screen gives you live control of 7 axis on your eMotimo devices. Your Pan/Tilt and two Motor ports (Labeled Slide and Turntable here) and 3 Tilta motors that can be added on your devices expansion port. It also shows you the 12 Presets. Pressing and holding a preset button will save the devices current position and turn the button green so you know there is a set position. A short press will return the device to the saved position using the timing set for that preset.
Page 6 & 14 (Virtual Control)
This screen has the same Live control interface as the previous page but instead of presets gives you Virtual Controls to navigate the eMotimo Menu system. This can be used to emulate the D-Pad of the PS5 remote that is often used with eMotimo devices.
Page 7 & 15 (Stops)
This screen lets you set and clear the Limits of your motors. Setting a limit can be done by pressing a red Stop A or Stop B button at which point it will turn green if the limit is correctly set. If a limit is set it can be recalled by pressing and holding the green limit button. You can clear all stops by pressing and holding the Clear All Stops button or you can clear the limits of a single axis by pressing and holding the Clear Motor X Stops buttons. You can also use the live control button to jog your motors between the limits you have set to test out your working range.
Page 8 & 16 (Speed Adjust)
This screen lets you adjust the maximum speed of each of the motors on your device. This uses the current profile of the eMotimo device you are using. If the device is set to Quiet/Fast and the Pan Speed on the Stream Deck is set to 50% that means the top speed the Stream Deck will use for live control is half of the max speed allowed in the Quiet/Fast motor profile.
Page 9 & 17 (Preset Adjust)
This screen lets you adjust the Run Time and Ramp Time of Presets. You can also Set and Recall the preset using the button in the bottom row the same way you would on Page 2. The defaults on startup of the Stream Deck core are 50 units (5.0 sec) run time and 10 units (1.0 sec) ramp time. Using the Up and Down Arrows will adjust these times and pressing the Run/Ramp Time buttons will reset the value to the default. This is a more verbose Preset Setup page if you do not want to use the Current Preset ID to cycle through the setup
Stream Deck+ Pages (18-23)
The Stream Deck+ is an Elgato Surface that has encoder wheels on it and some touch screen elements. There is currently not too many additional features on this surface compared to the Stream Deck XL (4x8 Surface). The most notable one is that you can use the encoder wheels for position based control of your Tilta Nucleus M motors on the Spectrum ST4.3, Spectrum Studio, and Conductor SA2.6 devices. These screens are on pages 18-23 (3 for each connection) if you are using a Stream Deck+ you can go to the surfaces tab in the Web UI and set the start page of the Stream Deck+ to be page 18 so it boots up on these pages.
Comments
0 comments
Please sign in to leave a comment.