In our "Spectrum ST4 in 5 Minutes" article, we briefly discussed the wireless gaming controller included with each ST4. In this article, we dive more deeply into the functionality and features of the remote.
Getting Started with the Wireless Remote
The video below explains how to charge your remote and connect it to your ST4.
Every new Spectrum leaves our production facility paired with the remote included in the case. To connect to your remote to the ST4, power on the ST4 by connecting the power adapter or battery and press and hold the circular center "PS Pair" button for approximately 1 second. The LED on the front of the controller will blink for up to 20 seconds before turning solid blue, indicating it has paired. If you're having trouble getting your remote to connect, or need to pair a new remote, take a look here.
The small rectangular protrusion directly above the ST4's power port is the Bluetooth dongle which allows the remote to pair with the Spectrum. We recommend leaving this inserted at all times.
Controlling the ST4
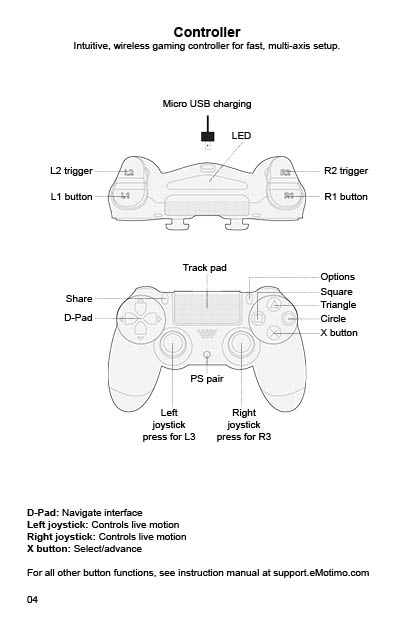
The diagram below is a reference to the buttons on the controller. Moving forward, this guide will reference the controls listed. If you're having issues replicating functions, please refer to this image to confirm you're using the correct controls.
When you power on the ST4, the first thing you see is the splash screen as the firmware is loaded, then the main menu. Navigating menus is easy and controlled by the D-Pad. Up/Down allows you to move between options in a menu, X selects the currently highlighted option (or enters the sub-menu as applicable), and left on the D-Pad returns to the previous menu selection.
Driving the ST4 is done through the left and right thumbsticks and R2/L2 triggers. The ST4 uses contextual controls, so movement is enabled only under certain contexts. We'll explore this in detail below; for now, try navigating to the "Live Motion" menu and driving the ST4 live with the following controls.
- Right thumbstick - Drives pan and tilt axis. Inflecting the stick left or right will pan in the corresponding direction. Inflecting the stick up (away from the user) tilts the camera downward, inflecting down (toward the user) tilts the camera upward.
- Left thumbstick - Drives the M3 port. In a standard setup, with a slider motor connected to the M3, Inflecting the stick left or right drives the slide in the corresponding direction.
- R2/L2 - Drives M4 port. Generally this is connected to focus or another motorized accessory.
Menu Options
Update: As of version R007_77, we've introduced the "Easy Mode" menu which allows for a more streamlined experience in setting up a shot. The main menu in this version allows users to select the mode in which they'd like to operate the ST4; select "Regular Mode" to return to the standard main menu.
Under most firmware versions, there are 4 menu options under the main menu: Live Motion, Programmed Shots, Photo Tools, and Settings. In this section, we'll explore the contextual controls for each.
Live Motion
The quickest way to drive the ST4 is with live motion, allowing the user to control the ST4 in real-time. This is a motion-enabled menu; the controls described above will move each axis using the control scheme described above.
Additionally, pressing up/down on the D-Pad will allow you to select additional motor profiles, adjusting how the rig responds to input. Click here for more detailed information on motor profiles.
Finally, pressing right on the D-Pad will allow you to cycle through GoTo Presets. You can learn more about these here.
Programmed Shots
You may already be familiar with the basics of setting a programmed shot. The contextual controls in this menu only enable movement when a start or end point parameter is selected.
Photo Tools
Looking to do panorama or gigapixel photos? You'll find what you need under this menu
Settings
The settings menu is navigated using up/down on the D-Pad and X to select and deselect. Selected parameters can be adjusted using up/down.
Comments
0 comments
Please sign in to leave a comment.