
Overview
In this article, we will be discussing how to configure your Network adapter using the ST4’s user interface in the settings menu. From the Settings menu on the ST4 you can configure your ST4 to be assigned an IP address from a router (DHCP), set to Static IP for use where auto address assignment is not possible (hubs). Additionally, we will describe how to recover from a full Network adapter reset where a user has intentionally pressed the recessed reset button on the side of the Network adapter.
Important Things to Know about configuration
- Make sure your Skaarhoj Panel is disconnected from the network or powered off while configuring your Network Adapter
- Your Skaarhoj controller needs to be on the same subnet as your Network adapter.
- This will work:
- PTZ extreme on 192.168.005.100 with subnet mask 255.255.255.0
- Network adapter for ST4 1 on 192.168.005.105 with subnet mask 255.255.255.0
- Optional Network adapter for ST4 2 on 192.168.005.106 with subnet mask 255.255.255.0
- This will NOT work:
- PTZ extreme on 192.168.005.100 with subnet mask 255.255.255.0
- Network adapter for ST4_1 on 192.168.006.105 with subnet mask 255.255.255.0
- Optional Network adapter for ST4_2 on 192.168.006.106 with subnet mask 255.255.255.0
Connecting New Network Adapter to Router
Configuring the eMotimo ST4 on DHCP
- Install the latest RC008_XXX firmware for the ST4. This update and installation instructions can be found here. It is recommended to use RC008_019 or later with Unisketch
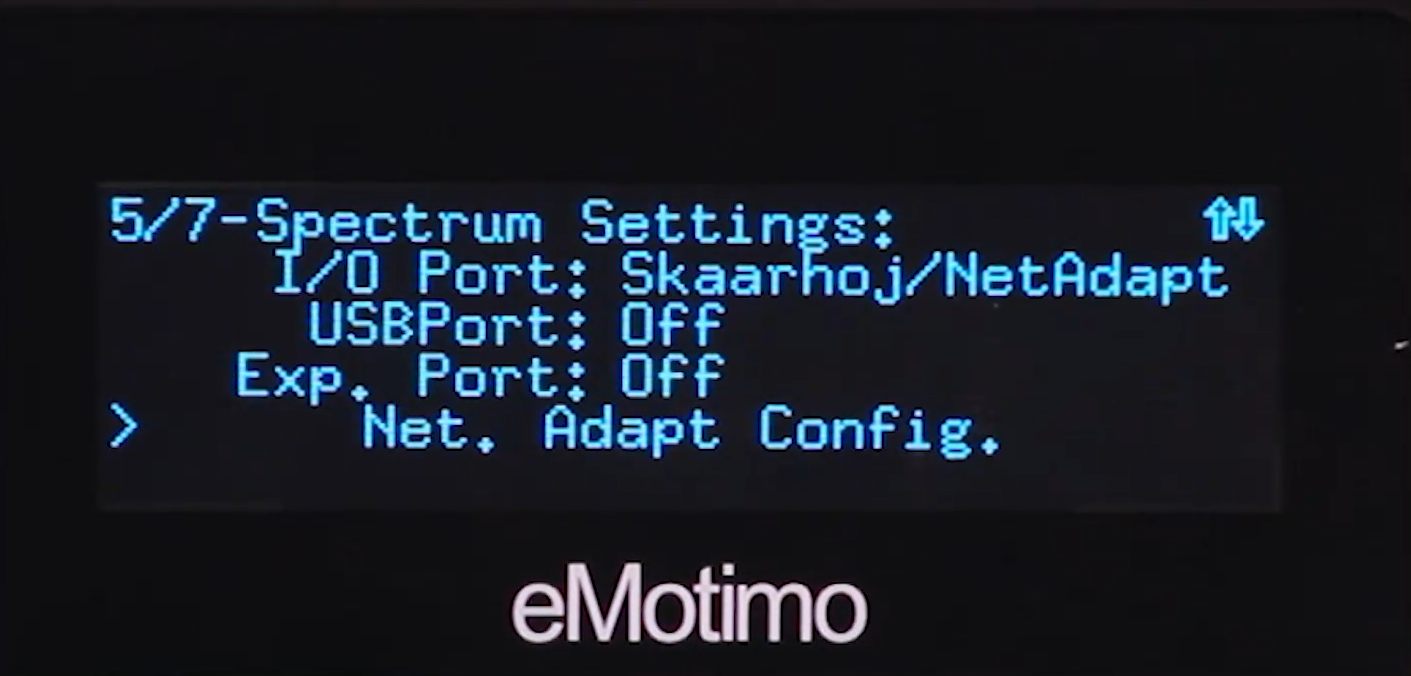
- Use the 8-Way switch to navigate to the fifth page of Settings, go down until you see:
i/o Port. Use the center button to highlight then use up/down to select “Skaarhoj/NetAdapt”. Click the center button to select it.

- Power down the ST4, then insert the 2.5mm TRS connector from the Network adapter to the i/o port of the spectrum.
- If your Skaarhoj PTZ controller is connected to the network, disconnect it or power it down. During this process we don’t want it making a connection to the Network adapter.
- Power up the ST4 and check that the i/o port is still set to Skaarhoj/NetAdapt.
- Return to the main menu. Do not connect the PS4 gaming controller at any time during Skaarhoj use.
- Power up the Network adapter using the included 5.0V wall adapter – IMPORTANT DO NOT POWER THE NETWORK ADAPTER WITH A WALL ADAPTER OVER 5.0V. IT WILL FRY YOUR NETWORK ADAPTER.
- Plug in an ethernet cable to connect your Network adapter to your network.
- The Network adapter, when shipped from eMotimo, is set to DHCP and should be auto assigned an IP address from you network. If you are connected to a hub or network that will not auto assign IP addresses, you cannot use DHCP. Proceed to the manually updating a static IP address section. You can determine the IP address it was assigned either through your router (the device will be named EMOTIMOST4_0XX) or through the ST4
Determine IP Address through ST4
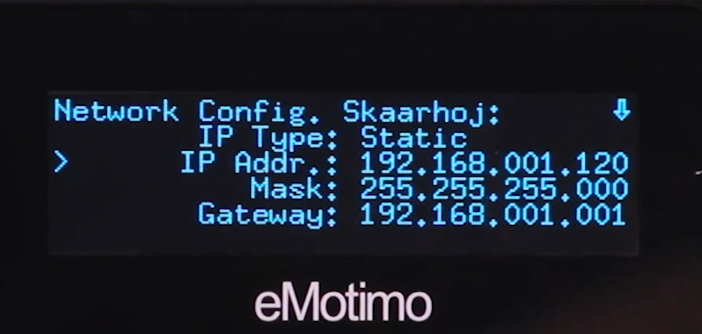
- Using the 8 Way switch, navigate to the fifth page of settings and select “Net. Adapt Config."
- The assigned IP address can be seen here
Locking your auto assigned IP to be Static
- If you do not intend on switching networks frequently, we recommend that you set the Network adapter to a static IP address. To do this:
- On the Net. Adapt Config. page, press in on the 8 Way switch to select “IP Type” and scroll down so that the IP type is static. Press in on the 8 way switch to confirm.
- Scroll down to the bottom of the Net. Adapt Config. page and select Auto-Configure.

- Exit out of the Net. Adapt Config. Page
- You can now power on the Skaarhoj and connect it to your network.
Changing Networks
If the new network you are moving to is a hub that cannot assign an IP address to the Network adapter, refer to the “Manually updating your Static IP Address” section. If the new network you are moving to is a router that can assign an IP address, refer to the “Setting Network Adapter back to DHCP for new network with a router” section.
Manually updating your Static IP Address
- Check that your ST4 is on the latest firmware, RC008_019. If not, the new firmware and instructions to update can be found here.
- On successful firmware upgrade, use the 8 Way switch to navigate to the fifth page of Settings, go down until you see i/o Port. Click in with button to make selection active and use up/down to select “Skaarhoj/NetAdapt”. Click the center button to select it.
- Power down the ST4, then insert the 2.5mm TRS connector from the Network adapter to the i/o port of the spectrum. Make sure that the Skaarhoj is not connected to the network during this process as it may prevent the Network adapter from changing its IP.
- Power up the ST4 and check that the i/o port is still set to Skaarhoj/NetAdapt.
- Return to the main menu. Do not connect the PS4 gaming controller at any time during Skaarhoj use.
- Power the adapter up by plugging into wall power with the included adapter.
- Plug in an ethernet cable to connect your Network adapter to your network.
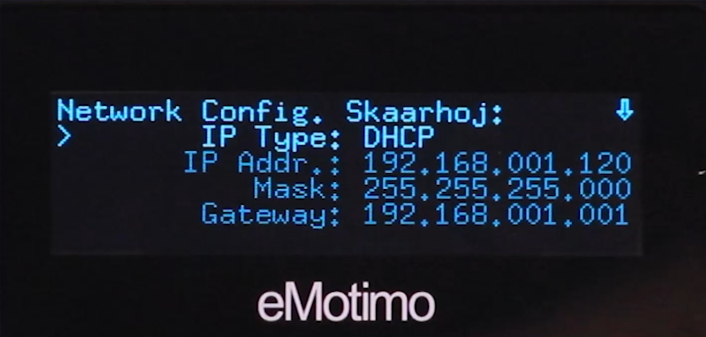
- Using the 8 Way switch, navigate to the fifth page of settings and select “Net. Adapt Config.”
- Change the IP address by selecting “IP Addr.” and toggling the 8 Way switch up/down to change the highlighted number. Confirm your change by pressing in on the 8 Way switch. – IMPORTANT – your Network adapter needs to be on the same Subnet as you Skaarhoj controller for it to be seen. (The subnet is the first three terms in the IP address i.e., 168.001.107)
- Scroll down to the bottom of the Net. Adapt Config. page and select Auto-Configure.
- Exit out of the Net. Adapt Config. Page
- You can now power on the Skaarhoj and connect it to your network.
Setting Network Adapter back to DHCP for new network with a router
- Check that your ST4 is on the latest firmware, RC008_019. If not, the new firmware and instructions to update can be found here.
- On successful firmware upgrade, use the 8 Way switch to navigate to the fifth page of Settings, go down until you see i/o Port. Click in with button to make selection active and use up/down to select “Skaarhoj/NetAdapt”. Click the center button to select it.
- Power down the ST4, then insert the 2.5mm TRS connector from the Network adapter to the i/o port of the spectrum. Make sure that the Skaarhoj is not connected to the network during this process as it may prevent the Network adapter from changing its IP.
- Power up the ST4 and check that the i/o port is still set to Skaarhoj/NetAdapt.
- Return to the main menu. Do not connect the PS4 gaming controller at any time during Skaarhoj use.
- Power the adapter up by plugging into wall power with the included adapter.
- Plug in an ethernet cable to connect your Network adapter to your network.
- Using the 8 Way switch, navigate to the fifth page of settings and select “Net. Adapt Config.”
- Select “IP Type” and toggle from “Static” to “DHCP”. Press in on the 8 Way switch to confirm your selection
- Scroll down to the bottom of the Net. Adapt Config. page and select Auto-Configure.
- Exit out of the Net. Adapt Config. page and then reenter it to see the updated IP address
- Exit out of the Net. Adapt Config. Page once you’ve noted the new IP address
- You can now power on the Skaarhoj and connect it to your network.
Recovering from a Reset Network Adapter
We never recommend that a user resets their Network adapter. This guide should be only used if someone does.
- Check that your ST4 is on the latest firmware, RC008_019. If not, the new firmware and instructions to update can be found here.
- On successful firmware upgrade, use the 8 Way switch to navigate to the fifth page of Settings, go down until you see i/o Port. Click in with button to make selection active and use up/down to select “Skaarhoj/NetAdapt”. Click the center button to select it.
- Power down the the ST4, then insert the 2.5mm TRS connector from the Network adapter to the i/o port of the spectrum. Make sure that the Skaarhoj is not connected to the network during this process as it may prevent the Network adapter from changing its IP.
- Power up the ST4 and check that the i/o port is still set to Skaarhoj/NetAdapt.
- Return to the main menu. Do not connect the PS4 gaming controller at any time during Skaarhoj use.
- Power the adapter up by plugging into wall power with the included adapter.
- Plug in an ethernet cable to connect your Network adapter to your network.
- Using the 8 Way switch, navigate to the fifth page of settings and select “Net. Adapt Config.”
- Select “IP Type” and toggle from “Static” to “DHCP”. Press in on the 8 Way switch to confirm your selection
- Scroll down to the bottom of the Net. Adapt Config. page and select Auto-Configure.
- Exit out of the Net. Adapt Config. page and then reenter it to see the updated IP address
- If you do not intend on switching networks frequently, we recommend that you set the Network adapter to a static IP address. To do this:
- On the Net. Adapt Config. page, press in on the 8 Way switch to select “IP Type” and scroll down so that the IP type is static. Press in on the 8 Way switch to confirm.
- Scroll down to the bottom of the Net. Adapt Config. page and select Auto-Configure.
- Exit out of the Net. Adapt Config. Page
- You can now power on the Skaarhoj and connect it to your network.
Comments
0 comments
Please sign in to leave a comment.